
Updated on 06/06/2015 : SSW LinkAuditor uncovered a broken link in this post.
Updated on 22/05/2015 : Thank you Adam Cogan, for giving me some feedback on the blog, which helped improve the post.
Recently at work I made the switch to Visual Studio 2015 and the new web essentials on an existing project and
#It felt like I’d burnt a lot of time on what should be a simple task!
This was due to the removal of automatic compiling of .less to css in Web Essentials for Visual Studio 2015 and confusion about Grunt and Gulp.
Decision: Grunt VS Gulp
In Visual Studio 2013 (and prior versions) we used build events. In 2013 the IDE would compile less to css and use the inbuilt tools, to handle our bundling and minification. Grunt was released by Ben Alman and in 2013 Gulp was released and most non-Microsoft web developers started using either Grunt or Gulp.
In Visual Studio 2015 they have included NPM and now can do such tasks with Grunt or Gulp.
They both are task runners, which means they are both tools that can be used to add automation to a project. By having them perform repetitive tasks, such as compilation, linting & minification. Technically Gulp and Grunt achieve the same goal but there are 3 reasons you should choose Gulp:
- Gulp has a huge speed advantage over Grunt
- Gulp focuses on code whereas Grunt focuses on configuration
- Gulp makes use of in-memory streams while Grunt uses temp files
In short just think Gulp is just like Grunt but faster and requires less configuration
Example: Using Gulp
Let’s create a simple task that will recurse through our content directory (eg. /content) and compile all the .less to .css
1. Add the package (package.json)
- Create a new package.JSON file in the root of the project
This JSON file is used by NPM to track dependencies. By adding a name of a package and version to this file, NPM will automatically locate, download and install the required package.
2. Add the gulp task (gulpfile.js)
- Create a new gulpfile.js file in the root of the project
In this file, all of the Gulp magic happens. It contains all of the Gulp tasks for the project.
- Copy and paste the following into the new file
A quick rundown of how this task works:
- It will recursively check every file and folder in the /content/ directory of your project.
- Upon encountering a less file it will be compiled into css.
- Creating the new css file in the same directory as the original less file.
- When an errors occurs, it is printed out to the screen
Please note we are using the package plumber to prove error handling otherwise the process would stop at the first error.
3. Test the Gulp task runs
- First do a quick test. To run a task outlined in this file open the Task Runner Explorer.
- Right click on Gulpfile.js and choose Task Runner Explorer.
- Right click on ‘less’ and click ‘Run’
- Look where your .less files are and check that the .css files are there
4. Tell the Gulp task to run on every Build
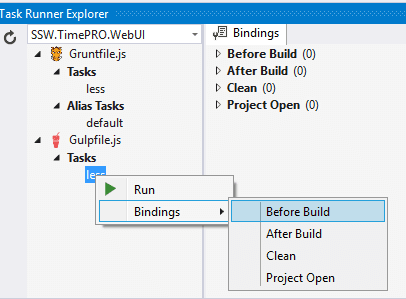
As can be seen in the image, to set when a task is run.
- Open the Task Runner Explorer window.
- Right-click the task and select when you want it to run in the bindings menu.
- Choose “Before Build”.
That was not so easy, but the pain will be worth it long term because now you can take full advantage of being able to automate trivial tasks with Gulp. For more information, you should check out this great post on bundling and minification by Jeffrey Fritz.
Feel free to tweet me comments, feedback or questions to @ChrisBriggsy.